


When you export your design using the Optimize mode of UiChemy, it will be about 90% responsive by default on responsive devices.
But if you want to manually customize the responsive values, you can do that with the Responsive Manager feature of UiChemy.
The values set in Figma design will be treated as the desktop value in Responsive Manager for calculating the responsive values for other devices.
Export as Regular Responsive Layout
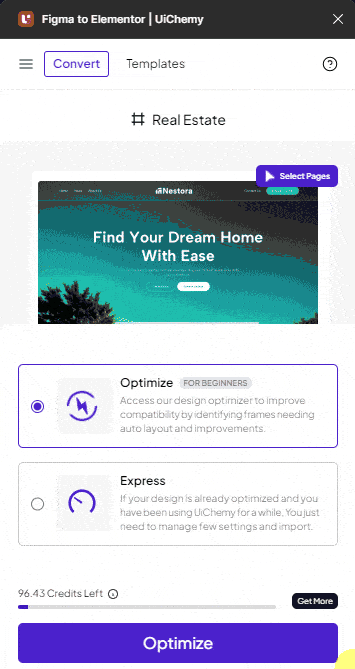
- To do this in Figma, open the UiChemy plugin and make sure you are logged in to your account.
- Select the top level frame of your layout, and then select either the Optimize option and click the Optimize button.
- Then click the Responsive Manager tab.
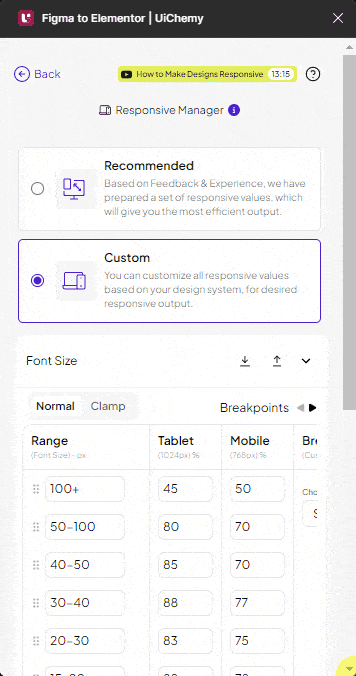
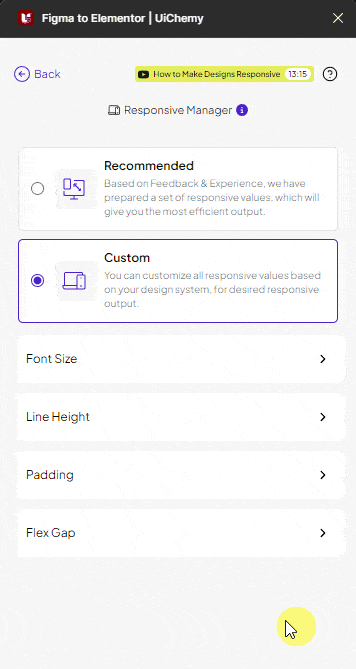
- By default, the Recommended option will be selected, which will give about 90% responsiveness. To set custom values, select the Custom option.
- From here, you can adjust the font size, line height, padding, and flex gap for different screen sizes.
Font Size
From the Font Size tab, you can adjust the font size for different screen sizes.
You can make the font size responsive in two ways –
- Normal – This way fixed pixel value will be used to adjust the font size for different screen sizes.
- Clamp – This way CSS Clamp value will be used to make fluid font size for different screen sizes.
Range – From here, you can set the font size range. The values will be set in pixels.
You have to set two values to create the range, like 20-30. This range will be calculated as per the font size set in Figma.
If you set broken ranges like 20-30 and 40-50, the font size will use the nearest range value. For example, a font size of 31px will use the range 20-30, and a font size of 39px will use the range 40-50.
Tablet – Here, you can set the font size for the tablet screen size. The value will be set in percentage.
Mobile – Here, you can set the font size for the mobile screen size. The value will be set in percentage.
Breakpoints – From here, you can add new responsive breakpoints. These breakpoints are calculated as per the Elementor breakpoints.
For instance, if a row has the following value Range: 20-30. Tablet: 50 and Mobile: 40 and in Figma, a heading font size is set at 30px.
Now the heading font size in tablet will be 15px i.e. 50% of 30px and in mobile 12px i.e. 40% of 30px in the exported Elementor template.
You can click on the + Add New to add new rows to add new responsive values.
From the Export Settings button, you can export the individual tab settings.
Then, from the Import Settings button, you can import existing settings as well.
Rules Order
Keep in mind, the responsive value will be calculated from top to bottom. So, the value set in the first row will apply first, and so on, even if there is an overlap in the responsive values.
For example, if a value is set for a range of 20-30 at the top, and then you add another range of 10-25 later in the table. Now, for a font size of 20px, the responsive value set in the range of 20-30 will be taken.
You can also delete a row by clicking the cross button in the Range column.
You can drag and drop to arrange the rows as well.
You can set a minimum font size in the Minimum Font Size field, so the font size doesn’t go below that size, irrespective of the values set in the responsive table. If you keep the field blank, no minimum font size will be set.
You can also use the Calculator to calculate the responsive values.
Line Height
From the Line Height tab, you can adjust the line height for different screen sizes.
Range – Here, you can set the line height range. The values will be set in percentages.
You have to set two values to create the range, like 100-120. This range will be calculated as per the line height set in Figma.
If the line height in Figma is set in pixels, it will be converted into a percentage first, then it will be calculated for responsive value.
Keep in mind, in the exported file, the line height values will be in em.
Similar to the Font Size tab, you can set responsive values in percentages for mobile and tablet. You can also add additional breakpoints from the Breakpoints column.
For instance, if a row has the following value Range: 100-120. Tablet: 90 and Mobile: 80 and in Figma, a paragraph line height is set at 100%.
Now the paragraph line height on tablet will be 90% and on mobile 80% in the exported Elementor template.
The responsive feature will not work if a mixed font size or line height is applied to a single text or paragraph in Figma.
Like the Font Size tab, you can add or delete rows.
From the Minimum line height is field, you can set a minimum line height value, so the line height doesn’t go below that value, irrespective of the values set in the responsive table.
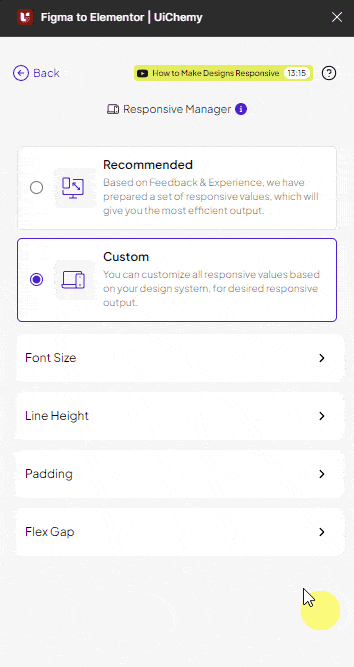
Padding
From the Padding tab, you can adjust the padding for different screen sizes.
Range – From here, you can set the padding range. The values will be set in pixels.
You have to set two values to create the range, like 10-20. This range will be calculated as per the padding set in Figma.
Similar to the Font Size tab, you can set responsive values in percentages for mobile and tablet. You can also add additional breakpoints from the Breakpoints column.
For instance, if a row has the following value Range: 10-20. Tablet: 60 and Mobile: 50 and in Figma a section padding is set at 20px.
Now the section padding in tablet will be 12px i.e. 60% of 20px and in mobile 10px i.e. 50% of 20px in the exported Elementor template.
Like the Font Size tab, you can add or delete rows.
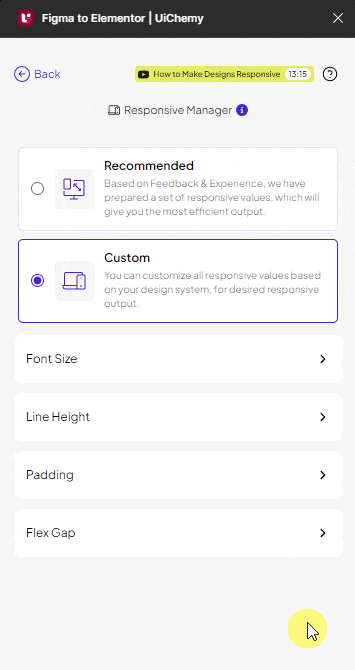
Flex Gap
From the Flex Gap tab, you can set the flex gap for different devices.
Range – From here, you can set the flex gap range. The values will be set in pixels.
You have to set two values to create the range, like 10-20. This range will be calculated as per the gap set in Figma.
Similar to the Font Size tab, you can set responsive values in percentages for mobile and tablet. You can also add additional breakpoints from the Breakpoints column.
For instance, if a row has the following value Range: 10-20. Tablet: 60 and Mobile: 50 and in Figma a section gap is set at 20px.
Now the section gap in tablet will be 12px i.e. 60% of 20px and in mobile 10px i.e. 50% of 20px in the exported Elementor template.
Once the settings are done, close the Responsive Manager popup by clicking the Back button at the top.
Now, if you export the design, the exported template will use your values as the responsive value.